Thursday, December 6, 2018

What Can I Do To Maintain My Roof?

1. Remove Loose Debris 

If your area has strong winds or heavy rain/hail, there is a possibility that branches, leaves, or other debris that can end up on your roof. It's best to remove this debris as soon as it is safely possible.  
It's also best to take care of these tasks on a sunny day when the roof is dry so that there is no concern with slipping.  Having another person to help hold the ladder or remove debris is also good for safety reasons.

2. Yearly General Inspection and Repair

The easiest way to take care of this part of maintenance is to call Lowry Roofing Co.  We do free inspections and free estimates.  If you are having your roof checked yearly, the likelihood that your roof is going to need major repairs is greatly diminished unless it is hit by really strong winds or hail.  You won't be hit by finding that you have had a slow leaking going on for some time and your home has received mold or water damage.
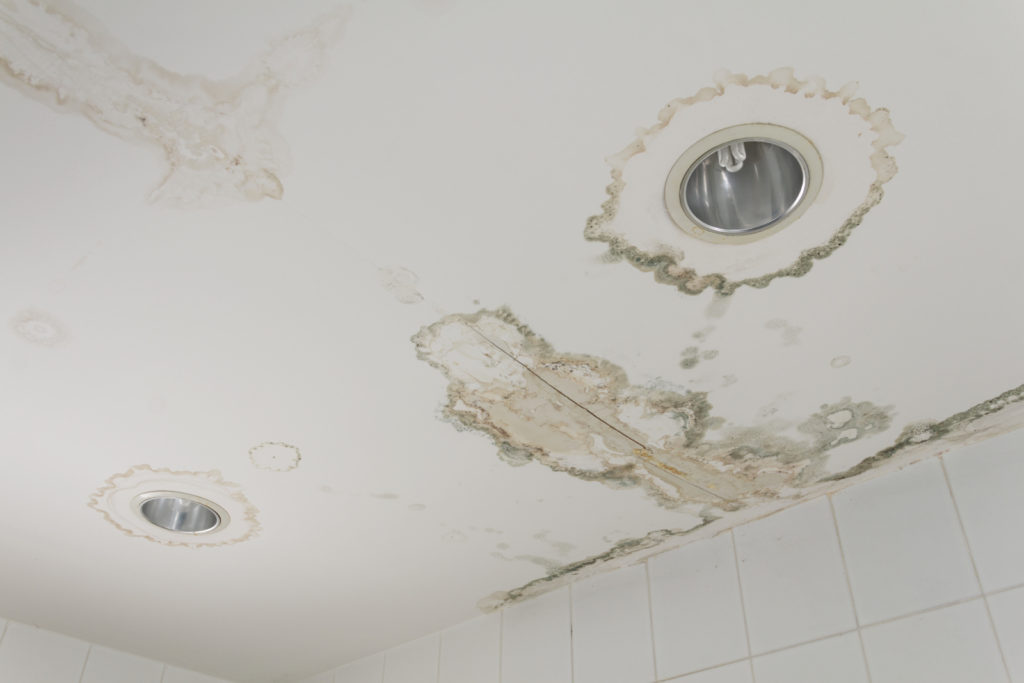
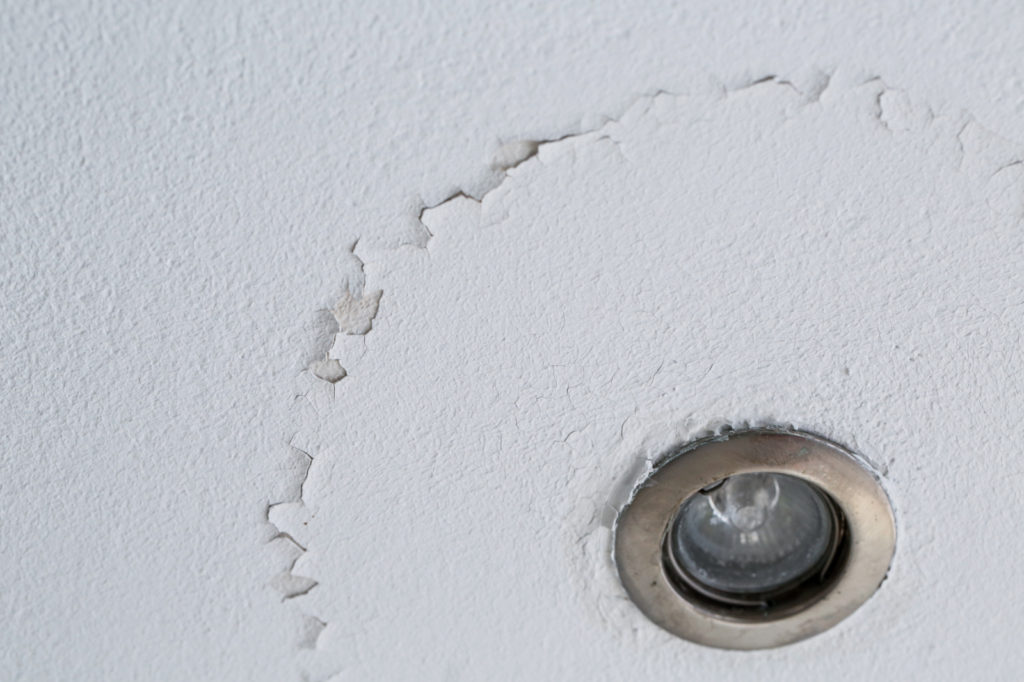
If you prefer to do the inspection yourself, a good place to start is the attic or other interior ceilings.  Check for stains that could indicate there is water seeping into your home. Next,  examine the roof for missing, lifted, or loose shingles and check the rest of the shingles for worn spots - indicated by missing granules, dents in the shingles, cracks, peeling and/or curling. 
Additionally, check for missing or loose flashing, and areas around raised items on your roof. Replace and repair shingles or flashing if needed.
Peeling, curling and partially lifted shingles found in more than one area of the roof can indicate that the roof is at the end of its usability. If you don't have experience with roof replacement and you see this level of damage, hire a professional roofer (call Lowry Roofing Co) to determine if the roof needs more than do-it-yourself maintenance.
It's a good idea to keep rain gutters and downspouts clean.  Rain gutters are often easily damaged, so work with care around them.  (Leaning on them could move them out of place or damage them - which could also be a safety concern if you are standing on a ladder). You may want to wear heavy rubber work gloves and then carefully remove, by hand or with a small scoop, all debris from the gutters and downspouts. If there is a buildup of dirt and dead leaves, you may want to gently scrub away the dirt and grime from all areas with a soft bristled cleaning brush. 
You can then clear away the remaining debris with a garden hose. Check for missing caulk and paint peeling, soffit and fascia rotting, holes and cracks, loose or missing gutter sections or hardware and gutter-related leaks. Make replacements and repairs and re-caulk and re-paint as needed.

4. Chimneys, Skylights and Vent Openings

Finally, you will want to look at any other items that come up from your roof, this includes the chimney, skylights, and vent openings. (In doing much work on the roof, it's a really good idea to wear a roof safety harness which literally can be life saving when working on your roof).  As far as the chimney is concerned, you will want to close off the fireplace, clean the creosote from the chimney with a chimney brush, and then inspect the chimney for damage such as missing or cracked bricks or mortar. 
Perform repairs if needed and then seal the chimney with a masonry or chimney water repellent product. 
And last, clean, inspect, and repair the vent outlets and skylights. 
Roof inspection and maintenance can be somewhat time consuming, but the benefits last far into the future.  You can catch the minor things that become major if they are not taken care of, and minor things are a lot easier to deal with and more cost effective than major things.  Lowry is always happy to give you a free roof inspection.  We make it easy for you.  Call Lowry Roofing Co today!

Thursday, October 25, 2018

Roof Dormers - Interesting Info


I found this great article about roof dormers on roofingcalc.com.  It is at this link:  https://www.roofingcalc.com/top-10-roof-dormer-types-and-costs/
I thought many of our blog-readers/ clients/future customers might find it interesting and informative.  It goes into the Top 10 Roof Dormer Types, plus costs and pros and cons of each.  It also first helps to determine the feasibility of doing a dormer.
Dormers make a house more interesting, they add light and ventilation, more room, maybe an extra exit...  Many homes today come with dormers.  This article is mainly about adding dormers if your home currently does not have one.  Of course, if your home didn't have any kind of dormer when it was built, and it is feasible to add one (or more), and you want to, the best time to do that is when you are replacing your roof.
If a dormer is something your home currently does not have, but something you think you would like, this article gives you the information you need to proceed with an idea of "if" it's feasible, pros and cons - as well as pros and cons of the different types, and cost estimates of each.  Hope you enjoy it!


Roofs and High Winds - What You Need to Know If You're Designing Your Home

Roof Types - The style of your roof can have a huge impact on how well your home withstands the weather in your area.  Different roof styles have their own strengths, but not all are suited for all areas - or all buildings.  That being said, here in North Texas, we get a lot of weather extremes.  One of the major threats to our roofs is high wind - and rain, and hail.  This blog is going to address those concerns.
Choosing the best type of roof for your home will greatly improve the likelihood of avoiding costly roof repairs due to extreme and harsh weather conditions.  The picture below shows the basic, different types of roofs.  A very common roof type is a 2-slope gable roof.  This type of roof is often cheaper to build than a hip roof, but allows the wind to catch the roof making it much more likely to be blown away.


Hip style roofs, on the other hand, have been proven in wind tunnel tests to be significantly more hurricane - resistant than gable roofs.  Consequently, some insurance companies give discounts to homeowners that have a roof shape that is at least 90% hip.  Because of this, it is quite popular to have the main mass of the house topped with a hip roof, with smaller gables added as a sort of embellishment for entry porches, dormers, and garages.
High Winds - The wind is not able to catch the edge of the roof as easily as it can with a gabled roof.  Usually, when a roof is blown off of a house, it is because the wind is able to push the roof up and away, separating it from the rest of the house.  With the roof gone or displaced, the rest of the house is in jeopardy of more and further damage.  Having the right roof style for your area can greatly diminish the likelihood of having your roof blown off.  Additionally, when designing your roof, it's a good idea to limit the overhanging around your roof to no more than 20 inches.  These overhangs also allow the wind to catch the roof making them more vulnerable to being blown off.
Heavy Rain - Hip roofs are also the best choice for areas with heavy rain.  Due to the roof having four sides, there is nowhere for the rain to settle on the roof, it has to go down.  Also, the four slopes provide some overhang on each side of the home, thereby protecting the siding from rain/hail damage.  You won't have a whole side of your house that is basically just at the mercy of the rain/hail.
The style of roof on your home will make a huge difference in its ability to stand up to harsh weather extremes - including really high winds.  Choosing the right roof style will also help protect your home's interior as well as exterior.  Having the right roof can bring peace of mind knowing you've done all you can do to protect your home - and your precious family - to the best of your ability, and that you will also likely have limited roof repairs.
If you need a roof inspection/estimate, call Lowry Roofing Co. 
Call Now

Tuesday, October 9, 2018

How to Fix Ceiling Water Stains - (Taken from Zillow.com)


Don't let those water stains hang over your head — a DIY fix is just a weekend away!
A water stain on a ceiling is a foreboding sight. Not only is it ugly, but it also often means that something is actively leaking, and more damage may be hidden.
But don’t panic — fixing a water stain is pretty straightforward. If you follow this simple guide, you’ll be ready to deal with any discoloration you find on your ceilings.

Find the source

First, check to see if there is any water on the floor below the stain. This will help determine if the leak is still in progress and how heavily it’s leaking. (This article is not dealing with a leaking roof - but you still could get water stains with a leaking roof.  MAKE SURE YOU ROOF ISN'T LEAKING!!! - Lowry Roofing Co.)
If water is on the floor, you’ll need to lay down towels or buckets to collect any remaining dripping water. Excessive water on your floor can stain carpets and buckle wood floors, so it’s best to dry it as soon as possible.
You might be tempted to repair floor damage at this time as well, but it’s probably best to wait until after you’ve finished all of the work on the ceiling, including the painting. You wouldn’t want to spill paint on a brand-new rug or on your new hardwood floors.


A water-stained ceiling with two light fixtures set in it.
Photo from Shutterstock.

Stop the leak

Water leaks can be caused by worn gaskets or failed fittings. If your pipes appear dry but you suspect the leak still exists, try running water into the device above the stain. For example, fill up and drain your tub. That should be enough to expose the problem if it still exists.
If you have a leak, you can either hire a plumber or attempt to repair it yourself. Most plumbing repairs are fairly simple and can be performed by most willing homeowners. Some older water stains may have been from a plumbing leak that was repaired years ago, but the stain itself was never properly addressed.


Flaking paint around a ceiling light fixture
Photo from Shutterstock.

Fix the stain

Check to see if the ceiling is wet or just stained. Most water stains will be on the ceiling below a bathroom fixture.

If the ceiling is wet …

  1. Poke a hole in the center of the water stain with a drill bit. Have a bucket on hand to catch additional water that’s trapped behind the ceiling.
  2. Check for mold (see rookie tip below).
  3. Fix the plumbing issue or hire a professional.  
  4. Make sure the drywall and the joists in the ceiling are dry before patching the ceiling. Patching a drywall hole in a ceiling is a very challenging project for a beginner. If you don’t feel confident in your joint compound skills, then it might be best to hire out this part of the repair.
  5. After the drywall patch is complete, apply two coats of primer and two coats of flat paint.
  6. Feather your painting to make sure it appropriately blends with the rest of your ceiling.
Rookie tip: Look for active mold growth in your ceiling space on the joists and on the back of the removed drywall paper. Mold grows readily in dark and damp places — and a wet ceiling space is an ideal environment. If you come across mold that you are unsure of, stop work immediately and call a professional.

If the ceiling is dry …

  1. If it’s not obvious where the stain is coming from, you can cut a hole in your ceiling with a drywall knife to expose the area above the stain. Look for wet or dripping pipes in that ceiling space. Slow, steady leaks from tubs or showers can sometimes occur intermittently.
  2. If you are sure you are working with an old stain and not an active problem, you do not need to cut into the ceiling. However, if you are concerned about mold, you may want to check.
  3. If you didn’t replace any drywall, then use a blocking primer and your chosen paint color to hide the stain.
  4. After the drywall patch is complete, apply two coats of primer and two coats of flat paint.
Rookie tip: Oil-based primers will hide stains better than water-based primers, but they are much more difficult to work with and clean. Water-based primers don’t hide stains as well and might require an extra coat, but brushes and rollers can typically be cleaned with soap and water.
Water leaks are a real pain, but with a little drywall, primer and paint, you’ll be well on your way to a spotless ceiling.

What To Do If You Have a Leaking Roof, But You Can't Get a Roofer


We are fast approaching severe weather occurrences in our area.  Unfortunately, rainy weather is when a roof leak is most likely to happen - or at least become a problem - and, further, unfortunately, when roofers become inundated with calls from panicked homeowners.

So, say your roof is leaking and you’ve contacted a roofer for help, but they can’t get to you immediately.  What will you do?  Actually, there are a few things you can do to to minimize the damage to your home’s interior as well as to your roof. A further win is that roofing companies often charge extra for emergency calls, but by you doing work ahead of time you likely will save money on your repair bill (there also won’t be as much damage from the leak).

Start Inside

First, deal with the leak inside your house so you can minimize interior damage.
Most of the time, a roof leak will form a small puddle in the attic and/or ceiling until it finds an escape route.  These escape routes are usually  a light fixture, heating register, or something similar. Additionally, where the ceiling boards meet (the junctures) and corners are other spots where leaks will often occur. Occasionally, these leaks happen in multiple places and yet originate from one source, making it look much worse than it usually is.

The immediate thing to do is put something under the leak (bucket or large cooking pots) and move any furniture or other articles in the room that could be damaged by water/moisture - off of the ground or away from the leak. You may also want to put drop cloths, garbage bags, or tarps on the floor to make sure that carpeting and flooring also stay dry.

If the ceiling is holding water or bulging, or you see a bulge in the drywall, you need to get a large container to hold water!  Usually a garbage can with wheels is best as it can hold a considerable amount of water and yet has wheels for easy movement.  Once the container is in place beneath the bulge, use a screwdriver or something similar to poke a hole in the center of the bulge. This will drain the water at that one spot, which will help lessen the damage to the ceiling and help collect the water into one stream.

You may further need to remove damaged drywall or ceiling tiles, but once things are under control inside, it’s time to find the source of the leak. 

Finding the Source of the Roof Leak

It can be quite difficult to find the source of a leaking roof.  However, if you don’t find the source of the leak, any repairs or temporary fixes you do are going to be useless. Water is tricky and can travel far from the origination point and cause damage elsewhere.

So, you want to start by locating the roof leak on the inside of your house. If your ceiling is bulging, it is likely from your roof, but there are other possibilities. Some of the possibilities for household leaks include plumbing, heating and cooling units, condensations, pest infestation or even clogged gutters.

Explore and investigate. The leak in your ceiling or wall will often appear not to align. This is when you will want to remove damaged drywall or ceiling tiles to see where the leak is coming from. Besides making it easier to find the source of the leak, it will help dry out the water-damaged space.

 The Attic

If you’re pretty sure the leak is from the roof, the best place to start may be the attic. Your roofing materials are almost always over a layer of plywood.  This means that water will often travel from the leak area in the roofing material to the nearest juncture in the plywood (The water travels underneath the roofing material once it gets under).

Grab another bucket or large container and a flashlight!  You may need to catch more water closer to the source. If your attic insulation is fiberglass, wear gloves and eye protection as well.  AND, grab a board or two; you may need them.

IMPORTANT!  (Here's where the boards come in).  If you are catching any water in the attic, do not put your container right on top of the ceiling tile or drywall because it could fall through when it fills up with water. Instead, put a piece or two of scrap wood, or boards, across the joists and put the bucket on them to catch any leaks.
Clear out any wet insulation that you find. If there is any standing water, soak it up with a sponge or rag until it is dried off.

Be aware that the location of the entry point into the attic may be in a different area than where the leak is coming through your ceiling.  Do a thorough investigation of the attic to locate the source.  Often, you can trace the path along a rafter, but water also sometimes follows the underside of the roof deck.

If it is still raining, check the leak and note what surface the leak is dripping from. This means you will  closely examine the underside of the rafters and the sheathing. You’ll want to look for water spots, drips or stains on the woods, or signs of mold growth.  

Additionally, check the insulation in between the ceiling joists to see if there are any signs of water damage, mold, or stains.  Clear out any wet insulation. You may have found where the leak enters your home, but it may not be where it originates.  Look for any other signs that lead to that spot.

The Roof

Do not attempt to examine your roof while it is raining. Exercise extreme caution when going on the roof. Be sure to take adequate safety precautions when you do examine your roof.  Wear rubber-soled shoes and be sure your ladder is secure. Again, wait for rain or wind to quit before examining your roof. 

Tarp is your quick and easy temporary solution until your roofer arrives.

You’ll need to cut the plastic so that it adequately covers the damaged area. Measure enough tarp to cover a section of the roof from the eave to the ridge, and then add an extra 4 feet.   Cut it from the roll with a utility knife. Make sure the tarp is extended over the ridge line, otherwise water will simply run under the tarp and you will still have the same problems.

Secure the tarp with 2 x 4 boards. Staple or nail the tarp to the boards (not the roof!).  Be sure that the nails you use are not so long that they will go through your roof.

Prevention

Leaks can often be prevented by doing preventative maintenance on your roof.  Many roofs have places that will leak when water is not allowed to flow properly. This is very common on pitched roofs at inside corners.

Further, any blockage can cause a leak, but especially those blockages in gutters or  downspouts.  Clearing out leaves and debris and thereby allowing water to flow normally can immediately make a leak go away.  If you want to keep it easy for yourself, just call Lowry Roofing Co. 


Lowry will make sure that your roof is ready for the weather.  No worries for you!  AND always inspections/estimates are Free!


Wednesday, September 19, 2018

We love working with our neighbors and 
our goal is to exceed your expectations!  
I think we're doing a great job!  Here is another testimonial:

Blake Lowell
a day ago-
Steven and Jon were very responsive and attentive and my roof is well done. They worked diligently to get the job completed in a timely manner despite a few weather delays. They are continuing to work with my insurance company regarding additional storm damages which had not been recognized by my adjuster. It has been helpful to work with a company that can make all needed repairs.


We would love to do your roof!  

Give us a call!

Lowry Roofing Co 


- Since 1923


  • Free Roof Inspection
  • Family Owned and Operated
  • Quality Work Completed in a Timely Manner


(469) 412-4364

Thank you!


We really appreciate all of you that have had us replace/fix your roofs.  Additionally, we really appreciate the testimonials!  We love what we do and a big part of that is working with our customers.  We love it!  And thank you!

We have been keeping our professionals busy, but we will make time for you.  Give us a call and let the professionals at Lowry Roofing Co show you why so many of our customers gladly write testimonials for us.  Our goal is to make you a believer, too! 


Lowry Roofing Co 

- Since 1923

  • Free Roof Inspection
  • Family Owned and Operated
  • Quality Work Completed in a Timely Manner


(469) 412-4364

Wednesday, August 29, 2018

Six Things to Consider When Choosing Your Roofing Shingles

 Homes have their own personality, and, though it's often not really thought about -unless you need a new roof - a roof is a big part of your homes appearance.  It seems like in our area many, many homes have the high sloping roofs which means that actually a large part of the appearance of your home is the roof.

There is more to picking a roofing shingle than just determining which color you like.  The right color and style of roofing shingles will also make a great first impression and enhance its curb appeal, potentially boosting its resale value.


Here are a few things you might want to keep in mind:


1.  The climate in your area - a roof can determine how warm/cool your home stays in the summer/winter.  The color of your roof can make a 20-40 degree difference in the temperature of your attic which can have quite a large affect on the heating of your home.  Light roofs reflect sunlight and keep the temperature of your home cooler, while dark roofs absorb the heat.


So, not only do you want to consider what you think looks the best, you'll want to consider which you want for your house - something that is going to help keep it cool, or something that will help keep it warm.  That being said, a lot still depends on your insulation and ventilation.


2.  Shingle color coordination - with colors found elsewhere - in the bricks, wooden siding, stone, stucco or trim on your home. This table shows some general guidelines, but again, you need to match according to your individual home:


HOUSE COLORBEST MATCHING ROOF SHINGLE COLOR
RedDark Brown, Black, Grey, Green
Light GreyGrey, Black, Green, Blue, White
Beige/CreamBrown, Black, Grey, Green, Blue
BrownGrey, Brown, Green, Blue
WhiteAlmost any color including Brown, Grey, Black, Green, Blue, White
Weathered Wood or Log HousesBrown, Green, Black, Grey
It can sometimes be very appealing to match your roof to trim, but you would want it to be something that is permanent.  If the trim could be painted over, you might end up with a roof that looks out of place on your house.  For that reason, roofs are generally matched with colors in the stone, brick, etc.

3.  Your architectural style - and colors of your home should be kept in mind. Dark colors make a home look smaller and light colors make a home look larger.

4.  Whether or not to “make a statement” - you could pick an unusual color combination with your home or you can to be more traditional.  Sometimes a contrast can really make a statement and make a house stand out.  Be sure if you go that route that it doesn't conflict with the houses around you.

5.  Neighborhood considerations - such as homeowner’s association and subdivision rules and covenants. Again, It’s also nice if your roof doesn't clash with your next door neighbor's roof.

6.  View what the color will really look like - virtually and, preferably, in real life. Owens Corning, a shingles company, has a color visualizer tool, that you can use to see what different color roofs might look like on a home like yours.  You can also actually upload a photo or your home, or you can look at photos of homes similar to yours, so that you have a good idea of what you would like.  

Either before, or when you have a good idea of the color of roof you prefer, contact a professional roofing contractor like Lowry Roofing Co.  We can let you know the process as well as the cost and what to expect.  We can give you a professional and efficient installation that will keep your home beautiful and protected from the elements for years.  Call us at 469.412.4364 for a free estimate or inspection 


Our goal is to exceed your expectations!

Lowry Roofing Co 

- Since 1923


  • Free Roof Inspection
  • Family Owned and Operated
  • Quality Work Completed in a Timely Manner


(469) 412-4364


Thank you for your testimonials!  Here is another:


We had met with another roofer who was referred and trusted by a friend and it ended up being a terrible situation and couldn't even get a simple quote. We reached out to Jon Lowry and he came by and went over everything and was able to give me a quote quickly and without needing our insurance information. We had requested some additional work besides new roofing and gutters and they not only gave us exactly what we wanted in color etc but the guys who came to work were always polite and respectful and hard workers. Lowry Gen. Contractors is very trustworthy and so easy to work with. I would recommend them for any work needed to be done. We will definitely use them again in the future.    ---- Amy Conroy

Tuesday, August 21, 2018

Call It A Sky-Light


No Matter What You Call It,

If It's Not Supposed To Be There,

It's Not Good!


Be sure you don't have any "sky-lights" in the making.
Have your roof inspected by Lowry Roofing Co - for FREE
They will catch any little problems before they get big.

Lowry Roofing Co

(469) 412-4364


or go to our website at:
and hit the button for a Free Estimate
and fill out the information
We'll make sure you're covered!

Saturday, August 18, 2018


It's never fun to have a

Leaking Roof! 


Make sure you don't find yourself in that position!
Normally, roofs should be inspected every three years, BUT
if you live in an area with extreme weather conditions
(think North Texas, here),
You should have your roof inspected every year.
Inspections are FREE
You might as well get yours scheduled today.

Call  469-412-4364
(or fill out the info on our website)
Tell them you want a FREE inspection
Give them your contact information
Tell them if you have any concerns regarding your roof.
That's it!


Monday, August 6, 2018

Love the Testimonials!


We Welcome the Opportunity to Serve You

And So Appreciate Your Business!


Thank you!


Now is a really great time to get your roof inspected or an estimate on a new roof - FREE.
Contact Lowry Roofing Co to schedule.